Forms
Each form you create appears in Forms Management within the form category you select during form creation.
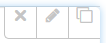
Tip: To expand a collapsed form category and view its forms, select ![]() on the category.
on the category.
In this topic
- Creating forms
- Editing forms
- Deleting forms
- Copying forms
- Publishing forms
- Managing published forms
-
Creating forms
To create a form, follow these steps:
- From the main menu, select HR > Forms > Forms Management.
- Select Create Form.
-
Complete the following fields:
Field Description Name Enter a unique name. Description Enter a description. Form Category Use the drop-down list to select a category for the new form to belong to. The drop-down list contains the names of all form categories you created. - Select a page tab to build on. Forms can have multiple pages. New forms begin with just one page, represented by the Page 1 tab. When building a new form, always start on the Page 1 tab. To add more pages, select + Page.
-
To add an element to your form, do either of the following:
- Select an element from the list on the left. Using this method always adds the element to the end of the current page, below any elements you already added. After adding an element, you can drag and drop it to change its position.
- Select and hold an element from the list on the left, and then drag and drop it into the area on the right. Using this method allows you to add the element wherever you want, including above or between elements you already added.
The following table describes the available elements:
Element Description Autocomplete Use to create a field that has one or more pre-defined options you set. You can set the field to allow any entry or to allow only one of your pre-defined options. Checkbox Group Use to add one check box or a group of check boxes with labels you set. You can choose how the check boxes are arranged (inline or not) and set whether the check boxes are selected or cleared by default when a user opens the form. Date Field Use to add a field with a drop-down calendar for selecting a date. Header Use to add a heading that indicates a title or new section on your form. You can set the size of your heading from largest (h1) to smallest (h6). Number Use to add a field that accepts a numeric value. You can set minimum and maximum values that the field should accept. Paragraph Use to add non-editable paragraph text to your form. For example, you could use this element to explain the form's purpose, convey important notes, or provide instructions. Radio Group Use to add one radio button or a group of radio buttons with labels you set. You can choose how the radio buttons are arranged (inline or not), set whether a specific radio button is selected by default when a user opens the form, and set whether an other option is available that lets users enter an unlisted option. Select Use to do either of the following:
- Add a drop-down list that allows users to select a single option from a list of options you set.
- Add a field that allows users to select one or more options from a list of options you set. Users can make multiple selections by holding either Shift (for a range) or Ctrl (for select items) on their keyboard and selecting options from the list.
Text Field Use to add a text field for which you can set a maximum length and select a field type or to add a field used to select a colour. Text Area Use to add a larger text field for which you can set a maximum length and number of rows. You can select from several available field types to choose whether this field allows users to add formatting and other elements like hyperlinks and images. Tip: All elements have the same basic controls in the form builder. Hover over an element until the controls
 appear on the top right corner. The following table describes how you use these controls:
 Control Description Remove 
Use to remove an element.
Edit 
Use to switch edit view on or off for this element.
Copy 
Use to create a copy of the element that retains all your settings. -
Complete the fields for the element you added. Many elements have the following fields in common:
Field Description Required Check box for making the field required so that the user must complete it to submit the form. Label Field for entering a name for the form element to appear on the form. When you enter a name in this field, the default form element name (for example, Checkbox Group) is replaced. Help Text Field for entering a tooltip users can refer to when completing the field. When you enter text in this field, a help icon appears next to the field name on the form. Users can hover over the help icon to reveal your tooltip. Placeholder Field for entering placeholder text to appear in a blank field until a user completes it. Class If you are proficient with HTML, you can use this field to add class attributes that change the appearance of the element's text (for example, bold or italic) or change the size of its controls. For a list of accepted class attributes, hover over the help icon above the form builder area. Options Group of fields for entering pre-defined options users can select from (for applicable elements). Each option you add appears as a row with two fields:

- In the left field, enter the label for this option that the user should see when they are completing the form.
- In the right field, enter the value to record in the background if the user selects this option. In the example above, if a user selects the option Yes on the form, the value in the background is set to 1. The value is not visible to users who complete the form, however you use the value when setting up notifications (alerts) for forms.
-
What do you want to do?
-
To add a new element: Return to step 5.
Tip: If you want to add a new element by creating a copy of an existing element, you can use the Copy control described in the Tip in step 5.
- To remove an element: Hover over the element and select on the top right corner.
- To add another page to your form: Return to step 4.
- To preview your form: Select Preview. When you are finished previewing, select Edit.
-
- When you are finished building your form, select Save. The form saves and you return to Forms Management.
-
To confirm your form saved, expand the form category you added it to and confirm the new form appears. If the form appears, it is now available to be published. For more information, refer to Publishing forms.
Editing forms
If you have not yet published a form, you can edit it. To edit a form, follow these steps:
- From the main menu, select HR > Forms > Forms Management.
- Expand the form category that contains the form you want to edit.
- On the form you want to edit, select Edit.
- Update the fields and form elements as required. Refer to the field and element descriptions in Creating forms if needed.
- Select Save.
Deleting forms
If you have not yet published a form, you can delete it. To delete a form, follow these steps:
- From the main menu, select HR > Forms > Forms Management.
- Expand the form category that contains the form you want to delete.
- On the form you want to delete, select Remove.
- On the confirmation window, select Delete.
Copying forms
You can create a new form based on an existing form. You can use this feature at any time, but it is especially useful if you want to change a form that you already published. Although a published form can no longer be edited, you can use the steps in this section to copy all of the original published form's settings to a new form you can edit.
To copy a form, follow these steps:
- From the main menu, select HR > Forms > Forms Management.
- Expand the form category that contains the form you want to edit.
- On the form you want to edit, select Copy.
- Update the fields and form elements as required. Refer to the field and element descriptions in Creating forms if needed.
- Select Save.
Publishing forms
When you publish a form, you are sending it out to be completed by one or more users. Before publishing, you set details such as who the form goes to, who approves submissions, whether the form expires, what message is sent with the form, and whether recipients receive reminders to complete it.
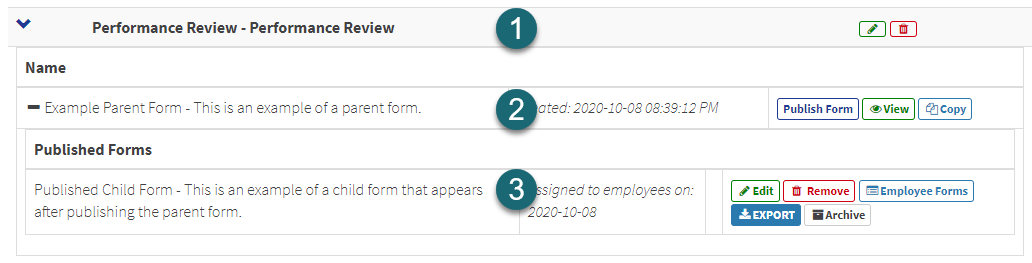
You can publish the same form more than once. For example, you can republish the same form used for an employee survey annually. Each time you publish, you can give the form a unique name, for example, Employee Survey 2020. This creates a structure wherein there is a parent form (the original form you created) and one or more child forms (published versions of the original form you created). You can review published child forms that exist by expanding a parent form and viewing the forms that appear under the Published Forms label. The following image shows an example of an expanded parent form (2) with a published child form (3) within an expanded form category (1):
To publish a form, follow these steps:
Note: After you publish a form, you can no longer edit or delete its parent form. These features are restricted because modifying the elements and/or criteria of a parent form would affect all its published child forms.
-
On the Settings tab, complete the following fields:
Field Description Name Enter a name for this published child form, for example, Employee Survey 2020. Descripton Enter a description. Form Category This is a read-only field. Review the form category selected to confirm it is as expected. Form This is a read-only field. Review the form name selected to confirm it is as expected. Expiry Date If you want this form to expire, enter a date. Employees can no longer complete this form after it expires unless you enter a later date in the Submission End Date field. Submission End Date If you want to set a submission end date, enter a date. Typically, you use this field to indicate an absolute cut-off date for submissions. The submission end date can occur after the expiry date to allow employees to submit a form that has already expired. Employees cannot submit a form after its submission end date. Allow multiple If you want employees to be able to submit the same form more than once, set this switch to Yes. This allows employees to submit a form as many times as you need them to, including more than once per day.
If you do not want employees to be able to submit the same form more than once, set this switch to No. With this setting, after an employee submits this form, they can never submit the same one again.
Approver Select one of the following options to choose how this form is approved when an employee submits it:
- None: The form is approved automatically.
- Home Department Time Approver: The form must be approved by the person who approves the submitting employee's time.
- HR Supervisor: The form must be approved by the person associated with the supervisor code set for the submitting employee on the Employee Job tab.
- Specific employee: The form must be approved by the person you select.
Assign By Select a method for determining who receives the form you are publishing. The option you select affects the fields that follow. Department(s) This field appears if you selected Department / Union in the Assign By field. Select one or more departments that contain employees who should receive the form, or leave the field blank to select all. Unions This field appears if you selected Department / Union in the Assign By field. Select one or more unions that contain employees who should receive the form, or leave the field blank to select all. Employee(s) This field appears if you selected Employee in the Assign By field. Select one or more employees who should receive the form, or leave the field blank to select all. -
On the Email tab, complete the following fields to configure the email that sends to the specified employees when you publish the form:
Field Description Sender Name Enter the name you want to appear as the email sender. Email Subject Enter a subject line for the email. For example, you could enter New survey available to complete: Employee Survey 2020. Email Body Enter body text to appear in the email. The text should explain that a new form is available to be completed. You could include other details such as the form's expiry date and/or submission end date, if applicable. You can use the formatting options to style your message.
Note: This field accepts specific template tags that allow you to auto-fill values related to this form and the employees who will receive it. For a list of accepted tags, hover over the help icon next to the Email Body field label. If you enter tags, ensure that you double-check what you entered for errors before sending. At this time, there is no preview option to ensure you typed the tags correctly.
-
On the Reminder tab, complete the following fields to determine whether employees who receive the form are reminded to complete it, and if so, how often:
Field Description Reminder Interval Select None, daily, weekly, or monthly. The option you select determines the fields that appear and need to be completed below.
Day of week to send Appears if Reminder Interval is set to weekly.
Select a day of the week for reminders to send.
Day of month to send Appears if Reminder Interval is set to monthly.
Select a day of the month for reminders to send.
Send Time Select a time for reminders to send.
Start Date Select a date to start sending reminders.
End Date Select a date to stop sending reminders, or leave this field blank to send reminders until the form's expiry date.
Email Subject Enter a subject line for the reminder email.
Email Body Enter body text to appear in the reminder email. You can use the formatting options to style your message.
Note: This field accepts specific template tags that allow you to auto-fill values related to this form and the employees who will receive it. For a list of accepted tags, hover over the help icon next to the Email Body field label. If you enter tags, ensure that you double-check what you entered for errors before sending. At this time, there is no preview option to ensure you typed the tags correctly.
-
On the Notifications tab, you can set up notifications that are triggered by certain events (like an employee submitting a form) or certain responses from employees on a form. Notifications can appear as a dialog box that an employee must acknowledge upon submitting a form or as an email sent to the employee. By default, there is a notification that sends a thank you message after they submit a form. If you want to edit this notification or set up additional notifications, follow these steps:
- Select Add Notification or select Edit on an existing notification.
-
Complete the following fields:
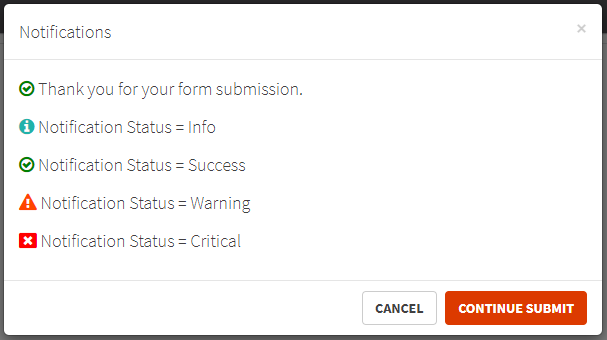
Field Description Description Enter a description to identify this notification in the list on the Notification tab. Notification Status Select a status that describes the notification type. For example, for a submission acknowledgment notification, you would likely use the Success status. If the notification is related to something more important needing review, you would likely use the Critical status.
Each status is associated with an icon. The icons appear in lists of form submissions to show at a glance the type of notifications the submission triggered. This can help approvers quickly determine which submissions they should review in detail. As shown in the image below, the icons also appear to employees on notification message boxes.
Note: The text that appears in the image is sample text entered to show relation between status types and their icons. The message text you enter appears in place of the sample text.
The colour of the icon is also used to colour code results in exported form submission data to indicate the status.
Notification method Select a notification method to use when an employee submits the form and the notification's criteria, if any, is met:
- Email Notification: An email sends to the person specified in the Send Email Notification To field.
- Submission Acknowledgement: A message box appears on the page in HRISMyWay. The message box can display multiple notifications if more than one is triggered.
- Both: An email sends and a message appears as above.
Send Email Notification To Appears if Notification Method is set to Email Notification or Both.
Select a person to send an email notification to. You can select Approver, Submitter, or a specific employee.
Subject Line Appears if Notification Method is set to Email Notification or Both.
Enter a subject line for the email notification.
Message Appears if Notification Method is set to Email Notification or Both.
Enter body text to appear in the email notification. You can use the formatting options to style your message.
Note: This field accepts specific template tags that allow you to auto-fill values related to this form and the employees who will receive it. For a list of accepted tags, hover over the help icon next to the Message field label. If you enter tags, ensure that you double-check what you entered for errors before sending. At this time, there is no preview option to ensure you typed the tags correctly.
Submission Acknowlegement Appears if Notification Method is set to Submission Acknowlegement or Both.
Enter text to appear in the notification message box.
-
You can add criteria to the notification so that it only sends in specific cases, such as when an employee responds a specific way to a form field. If you do not add criteria to a notification, it sends every time an employee submits the form. To add criteria to a notification, follow these steps:
- Select Add Criteria. A table appears with columns And/Or, Field, Operator, and Value.
-
For the first criterion you add, begin by using the Field drop-down list to select a field from your form. Then, complete the Operator and Value fields. The drop-down options and entry styles for the Operator and Value fields change as appropriate for the type of field you select in the Field drop-down list.
Example: If the field you selected is a check box group, the operator options are Equal and Not equal, and the Value field is a drop-down list that contains the back-end values you set up for each check box option.
- For each additional criterion you want to add, select Add Criteria again and then complete the And/Or drop-down list. Using this drop-down list allows you to create, for example, a set of criteria that must all be met for the notification to send (all use AND) or a set of criteria in which as few as one row must be met for the notification to send (all use OR). After setting this field, complete the remaining fields.
Tip: To remove any one criterion, select
 . To remove all criteria, select Remove All Criteria.
 - Select Save.
- Select Save.
- On the confirmation message that appears, select Yes to publish the form.
Managing published forms
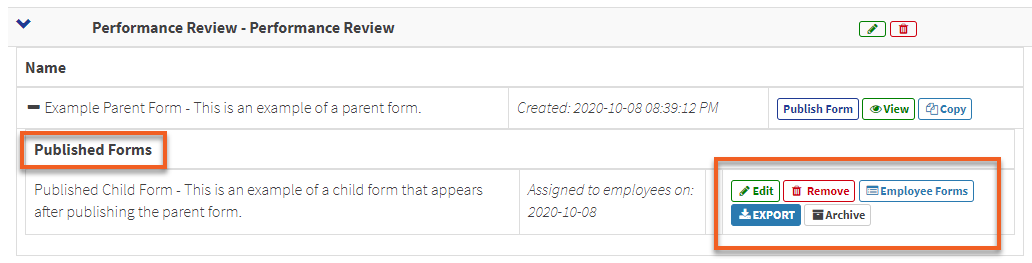
The options that appear on a published child form are different from those that appear on its parent form. The options are as follows:
| Option | Description |
|---|---|
| Edit | Use to edit the published child form. You might want to edit the form if you need to add an expiry date or change reminder and notification settings. |
| Remove | Use to delete the published child form. |
| Employee Forms |
Use to access a page with a list containing all employees this form was sent to when it was published. You can do the following on this page:
|
| Export |
Use to retrieve data about approved submissions for this form and then export the data to your clipboard or to Excel or CSV format. To use this feature, complete the Employee(s), Date Submitted Start Date, and Date Submitted End Date fields as needed, then select View Results. Results appear in a searchable table. When results are filtered as needed, select Copy, Excel, or CSV. |
| Archive | Use to move the form to Archived Forms. |
Viewing forms
After you publish a parent form, you can no longer edit it, but you can still view its details. To view a parent form, follow these steps:
- From the main menu, select HR > Forms > Forms Management.
- Expand the form category that contains the form you want to view.
-
On the form you want to view, select View.
Note: This option is only available on parent forms that have been published. It does not appear on individual published child forms nested under a parent form.
- When you are finished select
 to return to Forms Management.