Pay Periods
Pay period codes affect employees' time entry, time off requests, and accruals. Set them up by payment frequency (for example, weekly, biweekly, or monthly) and then add pay periods to them. Ensure you set up pay periods as far into the future as you want to allow employees to request time off. An employee can only request time off next year if next year's pay periods are created.
At the end of each year, review your pay periods and add new ones as needed. If you want to prevent employees from adding time to old pay periods, you can also set Allow Time to No for individual pay periods as needed.
In this topic
- Setting up new pay period codes
- Editing pay period codes
- Deleting pay period codes
- Adding pay periods for a new year to an existing pay period code
- Retiring old pay periods
Setting up new pay period codes
Setting up a new pay period code involves adding a pay period code, building pay periods in it, and setting automatic assignment details so that HRISMyWay assigns it to the correct employees. To set up a new pay period code, follow these steps:
- From the main menu, select Setup > Pay Periods.
- Select Add New Pay Period Code.
-
Complete the following fields:
Note: These fields are only editable if the pay period code is not yet assigned to any employees.
Field Description Pay Period Code Enter a unique name. This will appear as a pay period code option in the Employee Job tab. Description Enter a description. This will appear with the pay period code in the Employee Job tab. Frequency Select a pay period frequency. HRISMyWay uses this value when automatically assigning pay period codes to employees on the Employee Job tab to determine the code or codes that are eligible for assignment. -
In the Automatic Employee Assignment section, you set department, union, and pay type values for the pay period code. HRISMyWay can only assign this pay period code to employees with all matching values for frequency, department, union, and pay type on the Employee Job tab. Pay period code assignment occurs:
- When you bulk assign the pay period code to employees (refer to step 6).
- When a new employee record is created during synchronization.
- For existing employee records during synchronization if on the Employee Job tab the Pay Period Code field was set to None and/or the Frequency field changes.
Ensure that you review pay period codes that HRISMyWay assigns to employees on the Employee Job tab. If pay period codes assigned are not as expected, you may need to modify the department, union, and pay type selections and correct the assignments manually or through a bulk assign.
Complete the following fields:
Tip: You can select more than one value by selecting the field, selecting a value, and repeating. Select X on a value you have selected to remove it.
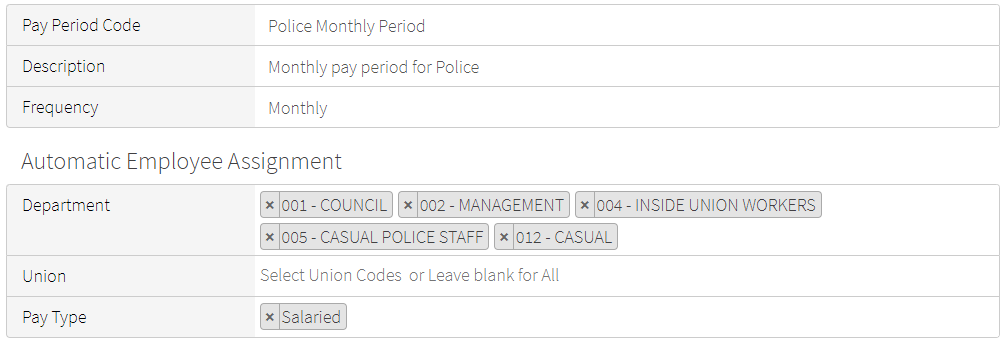
Field Description Department Either select all departments containing employees you want HRISMyWay to assign this pay period code to, or leave this field blank to set to all departments. Union Either select all unions containing employees you want HRISMyWay to assign this pay period code to, or leave this field blank to set to all unions. Pay Type Either select all pay types that apply to employees you want HRISMyWay to assign this pay period code to, or leave this field blank to set to all pay types. Following is an example of a pay period code after completing steps 3–4:
- Select Save.
-
Optionally, you can assign the new pay period code to employees whose records match the specified departments, unions, and pay types by selecting Assign and then selecting Yes. However, as noted in step 4, in certain cases HRISMyWay automatically updates employee pay period codes on the Employee Job tab during synchronization. If that occurs, your manual assignment may change if HRISMyWay finds another pay period code with a better match on frequency, department,
-
To create pay periods in the pay period code, follow these steps:
- On the new pay period code, select Years.
- Select Create Pay Periods.
-
Complete the following fields:
Field Description Period Year Enter the year to create pay periods for. You must enter a year that pay periods have not already been created for. Start Date Enter the start date of the new pay periods. # of Pay Periods Select the number of pay periods to create. The values in the drop-down list are based on the frequency of the pay period code (for example, the values available for a biweekly pay period code are 26 and 27). -
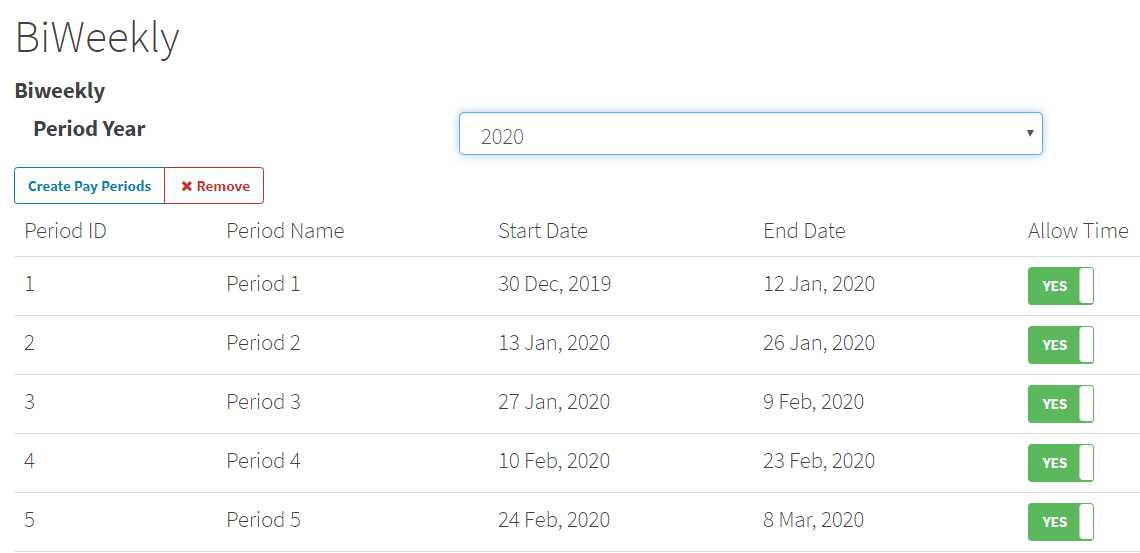
To generate the pay periods, select Build. The new pay periods appear in a table:
Note: If you created pay periods for the wrong year, you can remove them by selecting the year in the Period Year drop-down list, selecting Remove, and then selecting Delete. Then, return to step 7b and create pay periods in the correct year.
- Optionally, in the Allow Time column, select Yes or No for each pay period to indicate whether users can enter time in it.
- To return to the list of pay period codes, select
 .
.
Editing pay period codes
To edit a pay period code, follow these steps:
- From the main menu, select Setup > Pay Periods.
- On the pay period code you want to edit, select Edit.
- Modify the available fields as required.
- Select Save.
Deleting pay period codes
To delete a pay period code, follow these steps:
Note: You can only remove a pay period code that does not have pay period years created within it and is not assigned to an employee in the Employee Job tab.
- From the main menu, select Setup > Pay Periods.
- On the pay period code you want to remove, select Remove.
Adding pay periods for a new year to an existing pay period code
To add pay periods for a new year to an existing pay period code (for example, as part of your annual maintenance process or to allow for time off requests into the future), follow these steps:
- From the main menu, select Setup > Pay Periods.
- On a pay period code, select Years.
- Select Create Pay Periods.
-
Complete the following fields:
Field Description Period Year Enter the year to create pay periods for. You must enter a year that pay periods have not already been created for. Start Date Enter the start date of the new pay periods. # of Pay Periods Select the number of pay periods to create from the drop-down list. The values in the drop-down list are based on the frequency of the pay period code (for example, the values available for a biweekly pay period code are 26 and 27). -
To generate the pay periods, select Build. The new pay periods appear in a table:
Note: If you created pay periods for the wrong year, you can remove them by selecting the year in the Period Year drop-down list, selecting Remove, and then selecting Delete. Then, return to step 3 and create pay periods in the correct year.
- Optionally, in the Allow Time column, select Yes or No for each pay period to indicate whether users can enter time in it.
- To return to the list of pay period codes, select .
Retiring old pay periods
To prevent employees from adding time to old pay periods, follow these steps:
- From the main menu, select Setup > Pay Periods.
- On a pay period code, select Years.
- Select a year in the Period Year drop-down list.
- In the Allow Time column, select No for each pay period you do not want employees to be able to add time to.
- To return to the list of pay period codes, select .