Holidays
Holiday grid setup allows you to set up statutory holiday schedules. Holiday schedules are created using a regional template that you can edit to include additional holidays if needed. Set up and review your statutory holiday schedule(s) annually to ensure accuracy. You should also ensure that holidays are set up for all pay periods you have created so that holidays appear correctly to employees who request time off.
Holiday grids you create are available in the Holidays drop-down list during employee record setup on the Employee Job tab. The default value in the Holidays drop-down list is Use Default, so if you only set up one holiday grid and it is set as the default, it automatically applies to all employees. If you set up more than one holiday grid, you must manually select a value in the Holidays drop-down list when setting up each employee that the default holiday grid does not apply to.
During timesheet entry, dates that are part of a holiday schedule are marked by the same colour as weekends (orange). Weekend dates are always orange regardless of holiday schedules in effect.
In this topic
- Setting up new holiday grids
- Editing holiday grids
- Deleting holiday grids
- Adding holidays for a new year to an existing holiday grid
Setting up new holiday grids
Setting up a new holiday grid involves adding a holiday grid and building years within it. To set up a holiday grid, follow these steps:
- From the main menu, select Time Off > Configurations > Holidays.
- Select Add Holiday Grid.
-
Complete the following fields:
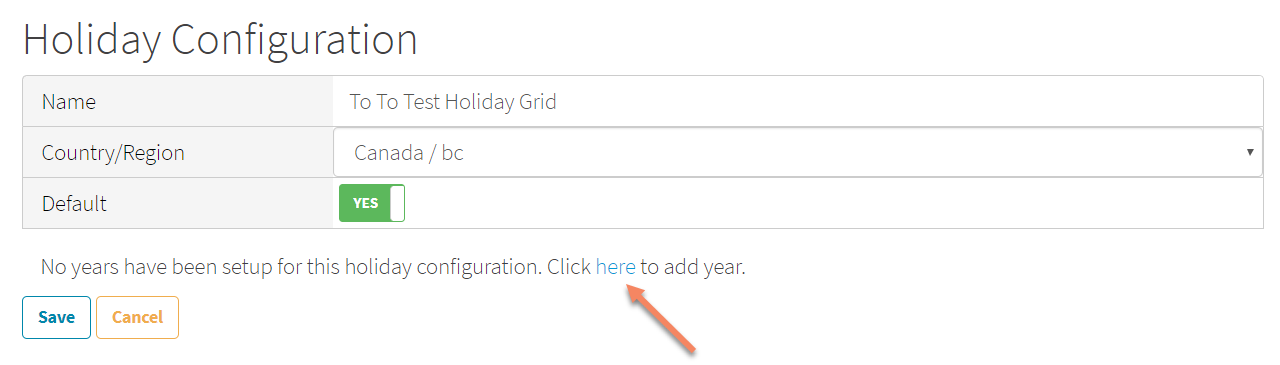
Field Description Name Enter a unique name for the holiday grid. Country/Region Select the applicable country and region combination from the drop-down list. Default If you want this to be the default holiday configuration, set this switch to Yes. Otherwise, set this switch to No. You can only have one default holiday grid. If you select Yes and a different holiday grid is already set as the default, this holiday grid becomes the new default, and this setting is updated to No for the existing default holiday grid. - Select Add.
- On the new holiday grid, select
 .
. -
To add a year, use one of the following methods:
-
If the holiday grid does not contain any years, follow these steps:
-
Select the hyperlinked word here in the text Click here to add year.
- On the Add Year window, enter a year.
- Select Add.
-
-
If the holiday grid already contains at least one year, follow these steps:
- Review the years in the Year drop-down list so that you know which years are already added.
- Next to the Year drop-down list, select
 .
. - On the Add Year window, enter a year that has not already been added.
- Select Add.
Note: If you added a holiday grid for the wrong year, you can remove it by selecting the year in the Year drop-down list, selecting
 , and then selecting Yes. Then, repeat step 6 and add the correct year.
 -
- In the Year drop-down list, ensure the new year you added is selected.
-
Review the dates created automatically for the new year to determine whether you need to make any changes. For example, ensure that the statutory holidays all land on weekdays and not on weekends. If needed, you can edit the dates as follows:
Note: When editing the Date field, select the field and use the calendar that appears to select a date.
- To add a date, select Add Day, complete the Name and Date fields, and then select Save.
- To edit a date, select , modify the Name and Date fields, and then select Save.
- To remove a date, select , and then on the confirmation window, select Yes.
- Select Save.
Editing holiday grids
To edit a holiday grid, follow these steps:
- From the main menu, select Time Off > Configurations > Holidays.
- On the holiday grid you want to edit, select .
- Modify the available fields as required.
- Select Save.
Deleting holiday grids
To delete a holiday grid, follow these steps:
- From the main menu, select Time Off > Configurations > Holidays.
- On the holiday you want to delete, select .
- On the confirmation window, select Yes.
Adding holidays for a new year to an existing holiday grid
To add holidays for a new year to an existing holiday grid (for example, as part of your annual maintenance process), follow these steps:
- From the main menu, select Time Off > Configurations > Holidays.
- On the holiday grid to add a new year to, select .
- Review the years in the Year drop-down list so that you know which years are already added.
- Next to the Year drop-down list, select .
- On the Add Year window, enter a year that has not already been added.
-
Select Add.
Note: If you added a holiday grid for the wrong year, you can remove it by selecting the year in the Year drop-down list, selecting
, and then selecting Yes. Then, repeat steps 4–6 and add the correct year. - In the Year drop-down list, ensure the new year you added is selected.
-
Review the dates created automatically for the new year to determine whether you need to make any changes. For example, ensure that the statutory holidays all land on weekdays and not on weekends. If needed, you can edit the dates as follows:
- To add a date, select Add Day, complete the Name and Date fields, and then select Save.
- To edit a date, select , modify the Name and Date fields, and then select Save.
- To remove a date, select , and then on the confirmation window, select Yes.
- Select Save.